In this tutorial, we are going to configure Nginx as Gateway for multiple servers sharing one single public IP.
We often need an entire dedicated or VPS server for some web application and if you are managing a large number of such servers that obviously need public IP for each to commutate. And consuming lots of public IPs is not a good solution for an enterprise in terms of cost. Here the Proxy or gateway concept comes into effect.
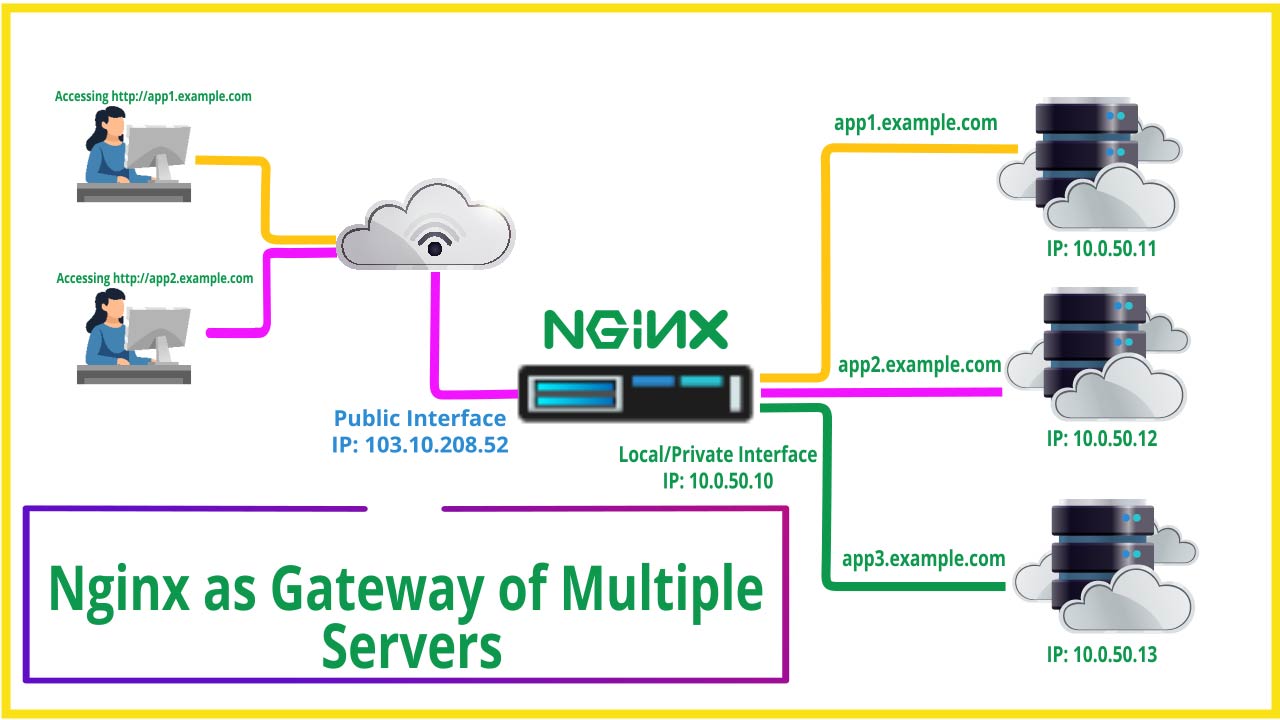
Now we are going to use Nginx as a gateway of multiple servers along with reverse proxy. The concept is that I have multiple servers running with the local IP address. And I am going to use one public IP to make all my local servers publicly accessible through Nginx.
Prerequisites and Environment for this Experiment:
- Nginx Server (With two NIC Port first one for Public IP 103.10.208.52 and the second one for Private IP 10.0.50.10)
- Application Server 1 (Having pre-installed Apache webserver to serve the web content over private IP 10.0.50.11)
- Application Server 2 (Having pre-installed Apache webserver to serve the web content over private IP 10.0.50.12)
So, before going to the actual process let me show you, my environment and scenario which I used here. Actually, I have a ProxMox data center and I have 3 LXC Containers one for Nginx and the other two for demo web applications having pre-installed Apache webserver to serve the web content as per the above requirement.

Follow Steps at youtube:
Steps to Configure Nginx as Gateway:
Step 01: Install Nginx at Server 01
Let’s go and login to our Nginx remote server. type
ssh [email protected] Your Public IP
It asking for add fingerprint first time, here we go and type in yes and put the server password
Always, the first thing is first to do update your package list. Go ahead and type
sudo apt update
Now, we need to install Nginx, Let’s move and type
sudo apt install nginx
And hit enter key.
After installing Nginx, you could check it perfectly running or not by using the service command just type
sudo service nginx status.
My Nginx server running.

you could check through your browser, open up a tab aside and type your public IP, and you could see the default Nginx page is serving.

Now enable Nginx service at boot, go ahead and type
sudo systemctl enable nginx.servicesudo service nginx restart.
Step 02: Config Proxy Parameters
Now we are going to edit the Proxy params file. Go ahead and type
sudo nano /etc/nginx/proxy_params
And add the following lines at the end as proxy parameters for better performance.
client_max_body_size 100M; client_body_buffer_size 1m; proxy_intercept_errors on; proxy_buffering on; proxy_buffer_size 128k; proxy_buffers 256 16k; proxy_busy_buffers_size 256k; proxy_temp_file_write_size 256k; proxy_max_temp_file_size 0; proxy_read_timeout 300;
Step 03: Config Nginx Virtual Host
Now you need to modify the default vhost file of Nginx, go ahead and type
sudo nano /etc/nginx/sites-available/default
Scroll down a little bit here you will find the virtual host configuration. Uncomment the lines. After that, move to the server name section the name of your first application server. In my case, I gonna given it app1.technhit.in.
...server { listen 80; listen [::]:80; root /var/www/html; # Add index.php to the list if you are using PHP index index.php index.html index.htm index.nginx-debian.html; server_name web1.hoanggiangnam.com; location / { proxy_pass http://192.168.1.25; include /etc/nginx/proxy_params; }}server { listen 80; listen [::]:80; root /var/www/html; # Add index.php to the list if you are using PHP index index.php index.html index.htm index.nginx-debian.html; server_name web2.hoanggiangnam.com; location / { proxy_pass http://192.168.1.26; include /etc/nginx/proxy_params; }}...
You need to change the server name and server IP (red marked) as per yours. After that, you need to save the config file and restart the Nginx server.
sudo service nginx restart
Step 04: Setup DNS Record
Now you need to add a DNS record to your name server pointing to your Public IP in order to access your application globally. For this experiment here I am going to add a local DNS resolver to access my application servers. For that open up a local terminal from the client system and edit the host file:
sudo nano /etc/hosts
and add the record.
103.10.208.52 app1.technhit.in103.10.208.52 app2.technhit.in
For Windows client edit C:WindowsSystem32driversetchosts file. And add the records.
Step 05: Testing
Now, open up a web browser and try to access the application by hostname.


Conclusion:
So, finally, we set Nginx as a Gateway of multiple standalone servers by the proxy method. This will reduce cost for your organization when your organization running multiple dedicated/VPS servers to serve different services for your Enterprise. Hope this tutorial helpful to you. Please do comment if you have any queries. And subscribe to encourage us and get the latest update. Thank you.