
Cách 1. Cài plugin ACF vào nhé.
Vào ACF tạo 3 field text
- san_shopee
- san_lazada
- san_tiki
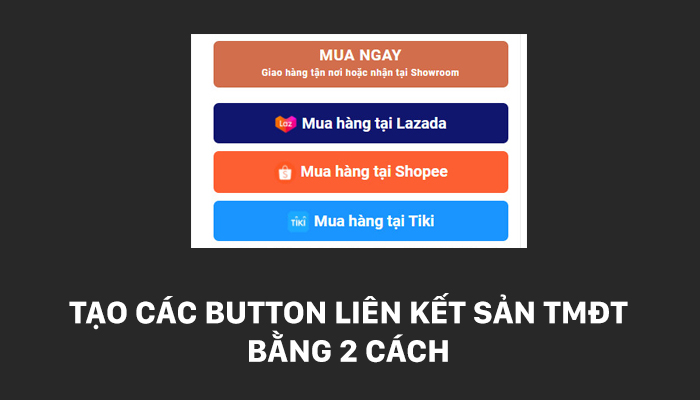
function btn_mua_hang() {
    if (get_field('san_lazada')) {
        ?>
        <a href="<?php echo get_field('san_lazada'); ?>" class="btn-san lazada-san">
            <img decoding="async" width="30" src="/wp-content/uploads/2021/10/lazada.png">
            <span>Mua hàng tại Lazada</span>
        </a>
        <?php
    }

    if (get_field('san_shopee')) {
        ?>
        <a href="<?php echo get_field('san_shopee'); ?>" class="btn-san shop-san">
            <img decoding="async" width="30" src="/wp-content/uploads/2021/10/6db931827443a7455a4b805fe5829820.png">
            <span>Mua hàng tại Shopee</span>
        </a>
        <?php
    }

    if (get_field('san_tiki')) {
        ?>
        <a href="<?php echo get_field('san_tiki'); ?>" class="btn-san tiki-san">
            <img decoding="async" width="30" src="/wp-content/uploads/2021/10/tiki.png">
            <span>Mua hàng tại Tiki</span>
        </a>
        <?php
    }
}
add_action('woocommerce_after_add_to_cart_button', 'btn_mua_hang', 0);
CSS button:
.btn-san {
    background: red;
    padding: 10px;
    width: 100%;
    display: block;
    text-align: center;
    color: #fff;
    border-radius: 7px;
    font-weight: 600;
    font-size: 20px;
    margin-bottom: 10px;
}

/* Nút Lazada */
.btn-san.lazada-san {
    background: #10156e;
}

/* Nút Shopee */
.btn-san.shop-san {
    background: #fd5e32;
}

/* Nút Tiki */
.btn-san.tiki-san {
    background: #1a94ff;
}
Hoặc thêm nút demo thì tạo field zz_demo và chèn code này vào function
/****** Thêm nút bổ sung Demo **********/
add_action('woocommerce_after_add_to_cart_button', 'demo_button_on_product_page', 30);

function demo_button_on_product_page() {
    global $product;
    $link = get_field('zz_demo');

    if ($link) :
        ?>
        <style>
            .demo_button {
                background-color: #e0520a;
                border: none;
                color: white;
                padding: 5px 15px;
                text-align: center;
                text-decoration: none;
                display: inline-block;
                font-size: 14px;
                font-weight: bold;
                transition: background-color 0.3s ease;
            }

            .demo_button:hover {
                background-color: #47b305;
                color: white;
            }
        </style>
        <a class="demo_button" href="<?php echo esc_url($link); ?>" target="_blank">Demo</a>
        <?php
    endif;
}
Cách 2 – Tạo button liên kết ngoài sử dụng custom field của woocommerce
Đầu tiên chúng ta sẽ tạo field trong admin.
function fields_muahang() {
    global $woocommerce, $post;

    echo '<div class="options_group">';

    // Thêm trường Lazada
    woocommerce_wp_text_input(array(
        'id'    => '_lazada',
        'label' => __('Lazada', 'woocommerce'),
    ));

    // Thêm trường Shopee
    woocommerce_wp_text_input(array(
        'id'    => '_shopee',
        'label' => __('Shopee', 'woocommerce'),
    ));

    // Thêm trường Tiki
    woocommerce_wp_text_input(array(
        'id'    => '_tiki',
        'label' => __('Tiki', 'woocommerce'),
    ));

    echo '</div>';
}

// Hook vào phần thiết lập sản phẩm WooCommerce
add_action('woocommerce_product_options_pricing', 'fields_muahang');
Và function lưu giá trị field
function save_field_muahang($post_id) {
    // Lưu trường Lazada
    if (isset($_POST['_lazada'])) {
        update_post_meta($post_id, '_lazada', esc_attr($_POST['_lazada']));
    }

    // Lưu trường Shopee
    if (isset($_POST['_shopee'])) {
        update_post_meta($post_id, '_shopee', esc_attr($_POST['_shopee']));
    }

    // Lưu trường Tiki
    if (isset($_POST['_tiki'])) {
        update_post_meta($post_id, '_tiki', esc_attr($_POST['_tiki']));
    }
}

// Hook để lưu dữ liệu khi lưu sản phẩm
add_action('woocommerce_process_product_meta', 'save_field_muahang');
Nhớ chép CSS trên vào nhé. Các field hiển thị ở phần này.

Cách 3: Thêm một nút đơn giản mà ko cần plugin ACF (Update)
Thêm mã bên dưới vào tệp function.php của chủ đề của bạn.
// Thêm nút Extra Button vào trang sản phẩm
add_action('woocommerce_single_product_summary', 'my_extra_button_on_product_page', 30);

function my_extra_button_on_product_page() {
    global $product;

    // Hiển thị nút với liên kết
    echo '<a href="URL" class="extra-button">Extra Button</a>';
}


